
Settings, currencies and your first users
Day one in Nexto: choose the reference currency and the Iranian unit, keep the guards on, set each currency's rate mode, and add one user per colleague.
Watch this video on: YouTube
Almost everything in an exchange office repeats. The setup does not. There are four jobs you do once — the base settings, the currencies, the rate board and the users — and half an hour spent on them on day one saves hours of untangling three months later.
Two of those decisions have no way back. The reference currency, and for offices working in Iranian money the choice between rial and toman, both lock once real vouchers exist. Everything else can be revisited whenever you need it.
This article covers three of those four jobs: the base settings, the currencies and your first users. The rate board is big enough to have its own episode, and it follows this one.
What you will learn
- Which four parts of the settings page actually matter on day one
- Why the reference currency locks after the first voucher, and how to pick one
- What the adjustment, in-place edit and backdating windows do
- What each of the five guards prevents, and which one people wrongly switch off
- How divide and multiply rate mode work, and what the wrong one costs you
- How to add a currency, set its decimals, and keep cash and remittance apart
The base settings
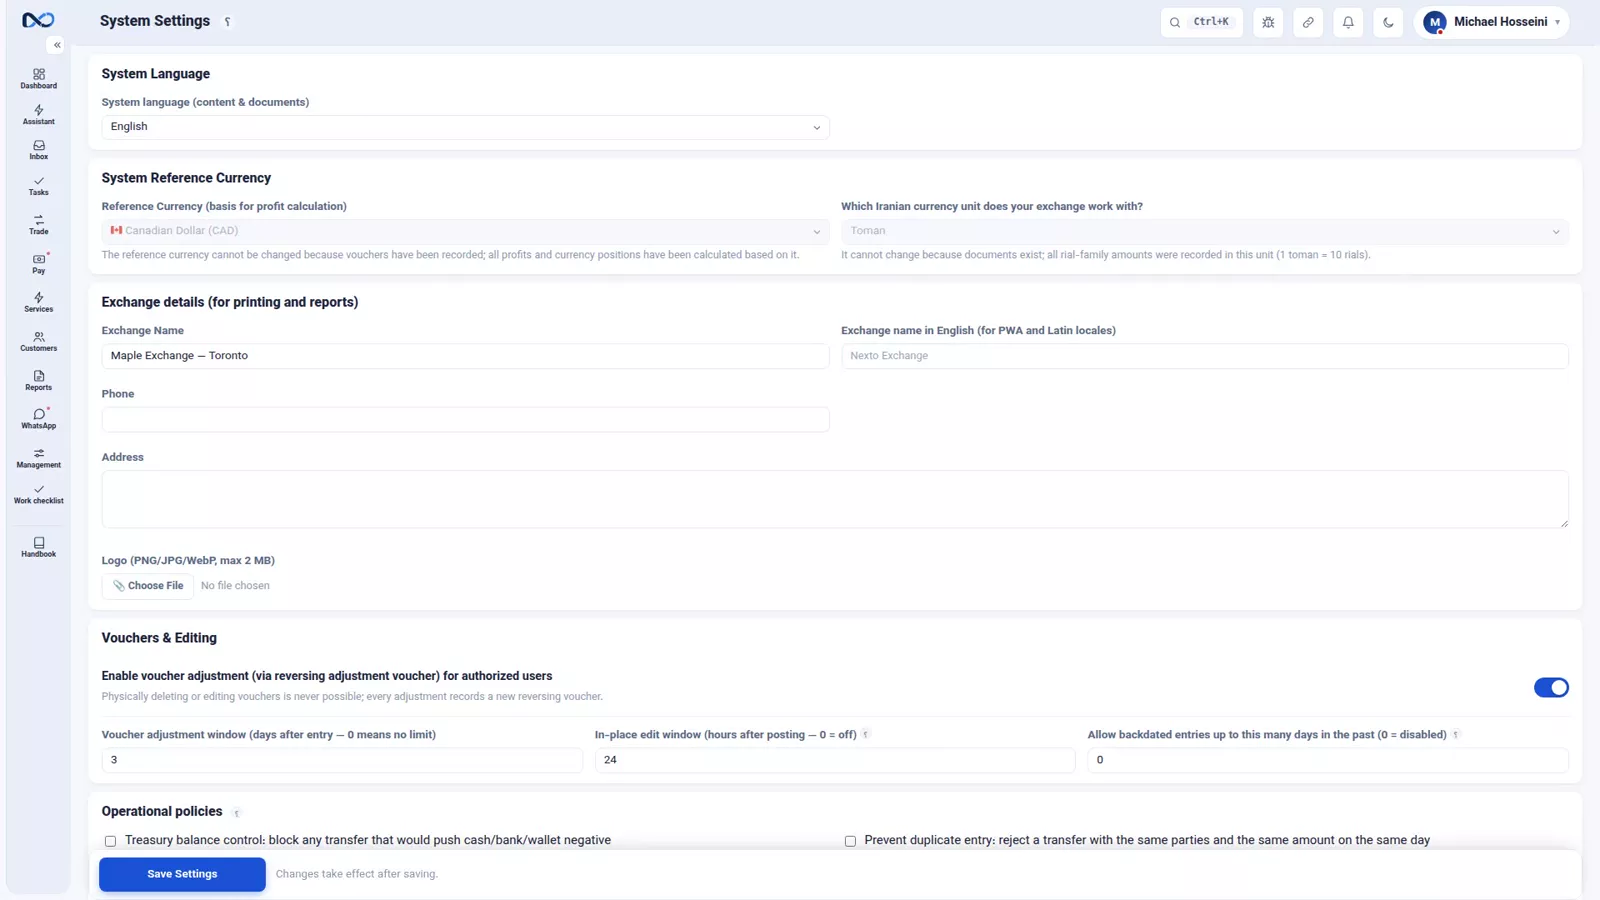
The settings page looks crowded, but only four parts matter on day one: the reference currency, the Iranian currency unit, the exchange details, and the guards. The rest you come back to when a need turns up.
Pick the reference currency
The reference currency is the currency every summary and every profit and loss figure is written in. Any activated currency can be chosen — in the demo office there are seven, so seven options. Most offices pick a stable one: the US Dollar, or the UAE Dirham if the bulk of the work runs through the Emirates.
This is the decision with no way back. The profit on every trade is worked out in this currency at the moment of booking, and stored. Until the first voucher exists you can still change it; after that it locks, to protect the figures already stored.
Pick rial or toman
The second irreversible decision belongs to offices dealing in Iranian money: rial or toman. Nexto knows both, but you choose one and stay with it to the end, because every figure is stored in the unit you picked.
Fill in the exchange details
The exchange details sit on every output that leaves the office: the customer statement, the PDF, the WhatsApp message. Write the name the way your customers already know it, put the phone number and the address in full, and upload the logo on the same page.
Set the three edit windows
Three numbers decide how freely a voucher can be corrected after it has been entered.
- The adjustment window — for how many days after entry a voucher can still be edited.
- The in-place edit window — a short period, counted in hours, in which an edit leaves no trace.
- Backdating — how many days into the past you are allowed to book a document.
A sensible start is three days for the adjustment window, twenty-four hours for the in-place edit, and zero for backdating. It is strict on purpose: opening these up later is easy, reeling them back in is not.
Leave the guards on
The guards are five checkboxes, each stopping one mistake that is common in exchange work:
- The treasury guard will not let a cash box go negative.
- The repeat-transfer block refuses the same amount to the same account twice within a few minutes.
- A description is required on a trade.
- A description is required on a transfer.
- A tracking code that has already been used is rejected.
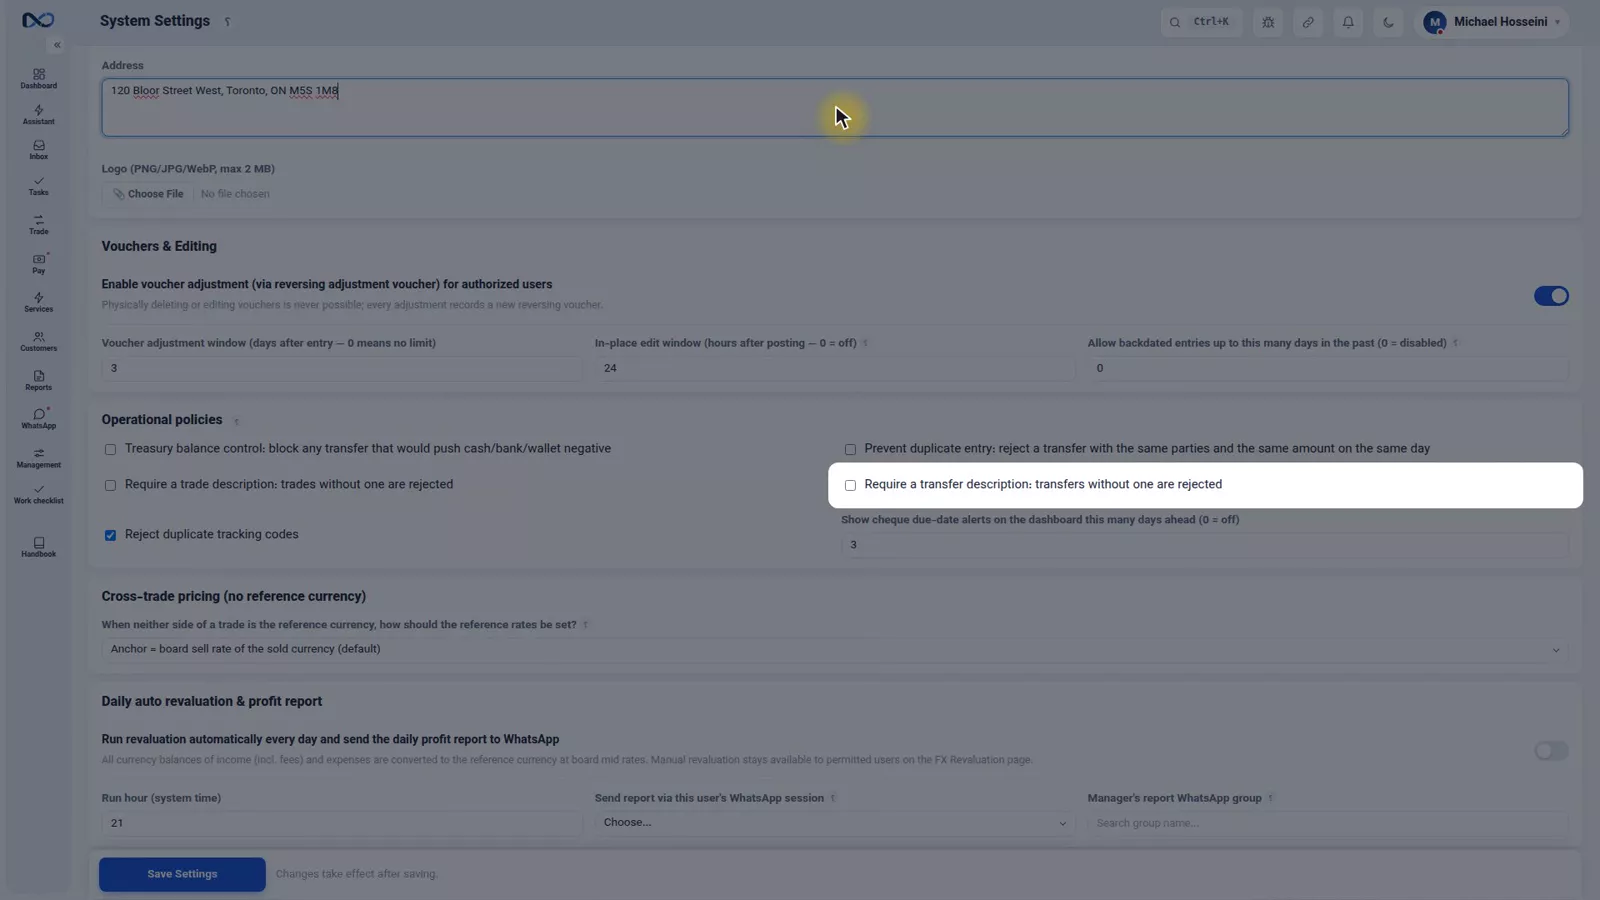
Leave all five on. The one people switch off is the required description, because it feels like friction at the counter — and then three months later somebody is staring at a voucher and nobody can say what it was for. Save the page, and the base settings are done.
The currencies
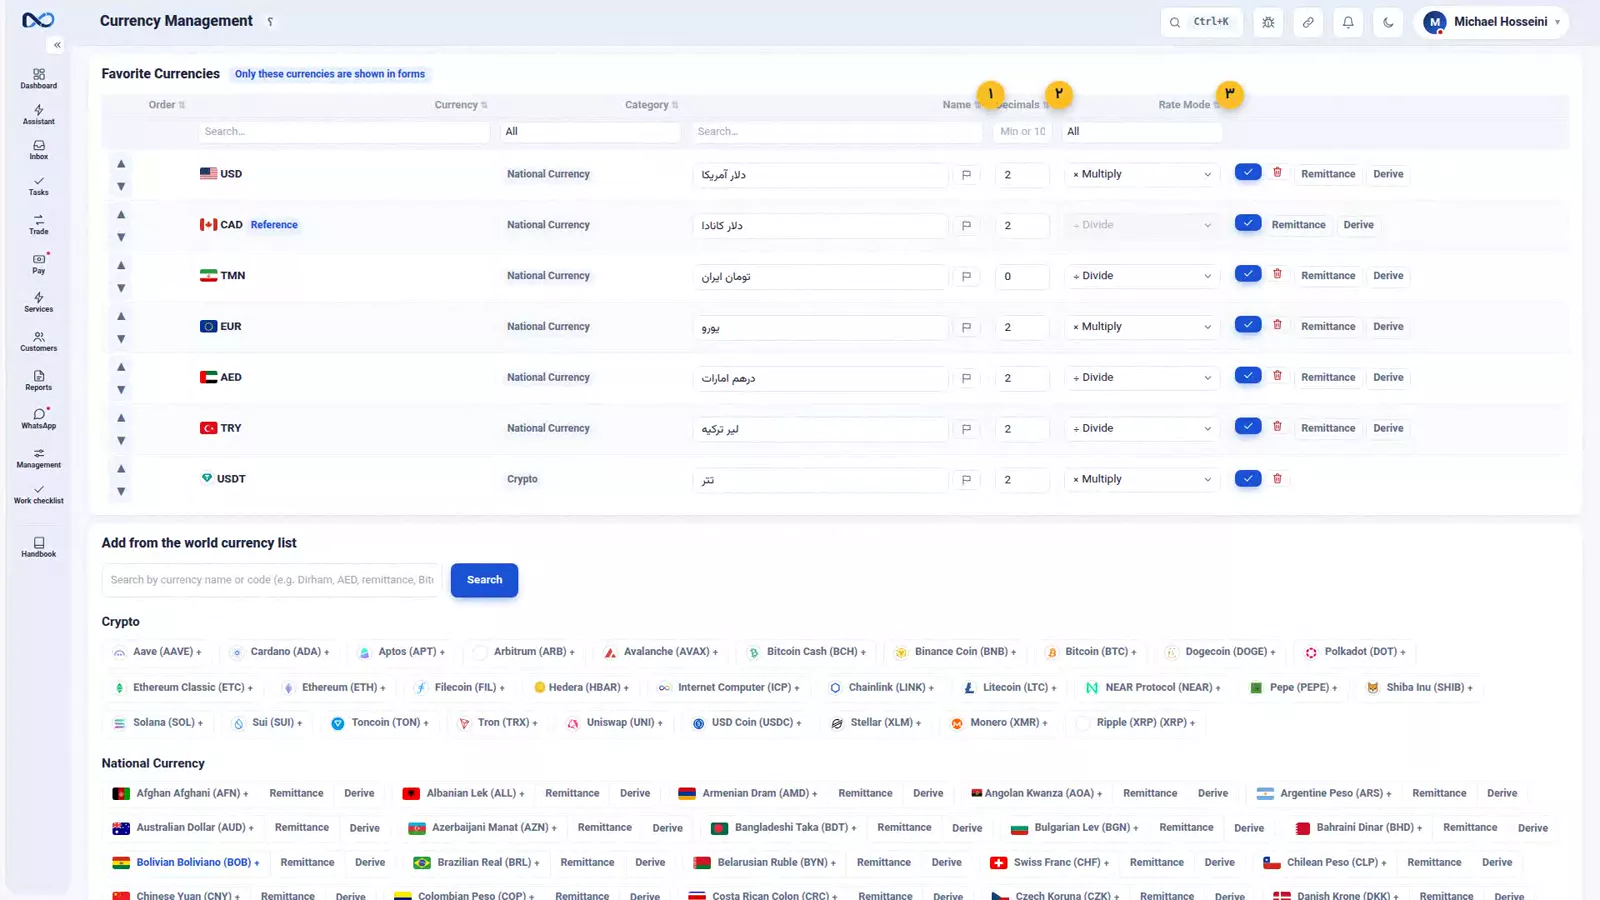
The currencies page has your active currencies at the top and, below them, a world list of more than two hundred currencies, cryptocurrencies and gold, each switched on with a single button. Every active currency carries three things: a name, a number of decimals, and a rate mode.
Get the rate mode right
The rate mode column holds one of two values for every currency, divide or multiply. It is the single most important setting on the page, and where most mistakes happen. The rule is short. If you quote the rate per one Canadian Dollar — every Canadian Dollar is 162,100 Toman — that is divide mode. If you quote it per one unit of that currency — every Euro is 1.607 Canadian Dollars — that is multiply mode. Say the quote out loud in the form your dealers actually use, and the mode picks itself.
Set it the wrong way round and nothing goes red. Put the UAE Dirham on multiply and 100 Dirhams comes out at 265 Canadian Dollars instead of 37.7 — seven times over. Nexto raises no error, because arithmetically the number is fine. You are simply the one losing money.
Set the decimals
Toman takes zero decimals. The main currencies and Tether (USDT) take two. Small cryptocurrencies such as Bitcoin need six to eight. Set them too low and figures get rounded on every document, and balances drift apart by a few cents at a time that nobody ever finds again.
Add a currency and split cash from remittance
To add a currency, type its name in the list below and press the plus button — the British Pound, for example. It moves straight to the top of the active list with a rate mode Nexto has guessed for itself. Always check that mode yourself; a guess is not a decision.
Beside every currency there is also a Remittance button. It creates a separate currency for the same money in remittance form, with a rate of its own. Press it on the UAE Dirham and a dirham remittance joins the list: an office that sells cash dirhams and remittance dirhams at two different prices then has two balances and two rates that never get mixed up. If you do not need it, the delete button takes it back off the list.
Your first users
The last day-one job is the users, and the timing matters: build a separate user for every colleague before the real work starts. Every voucher keeps the name of whoever booked it, and if the whole office shares one login that name tells you nothing.
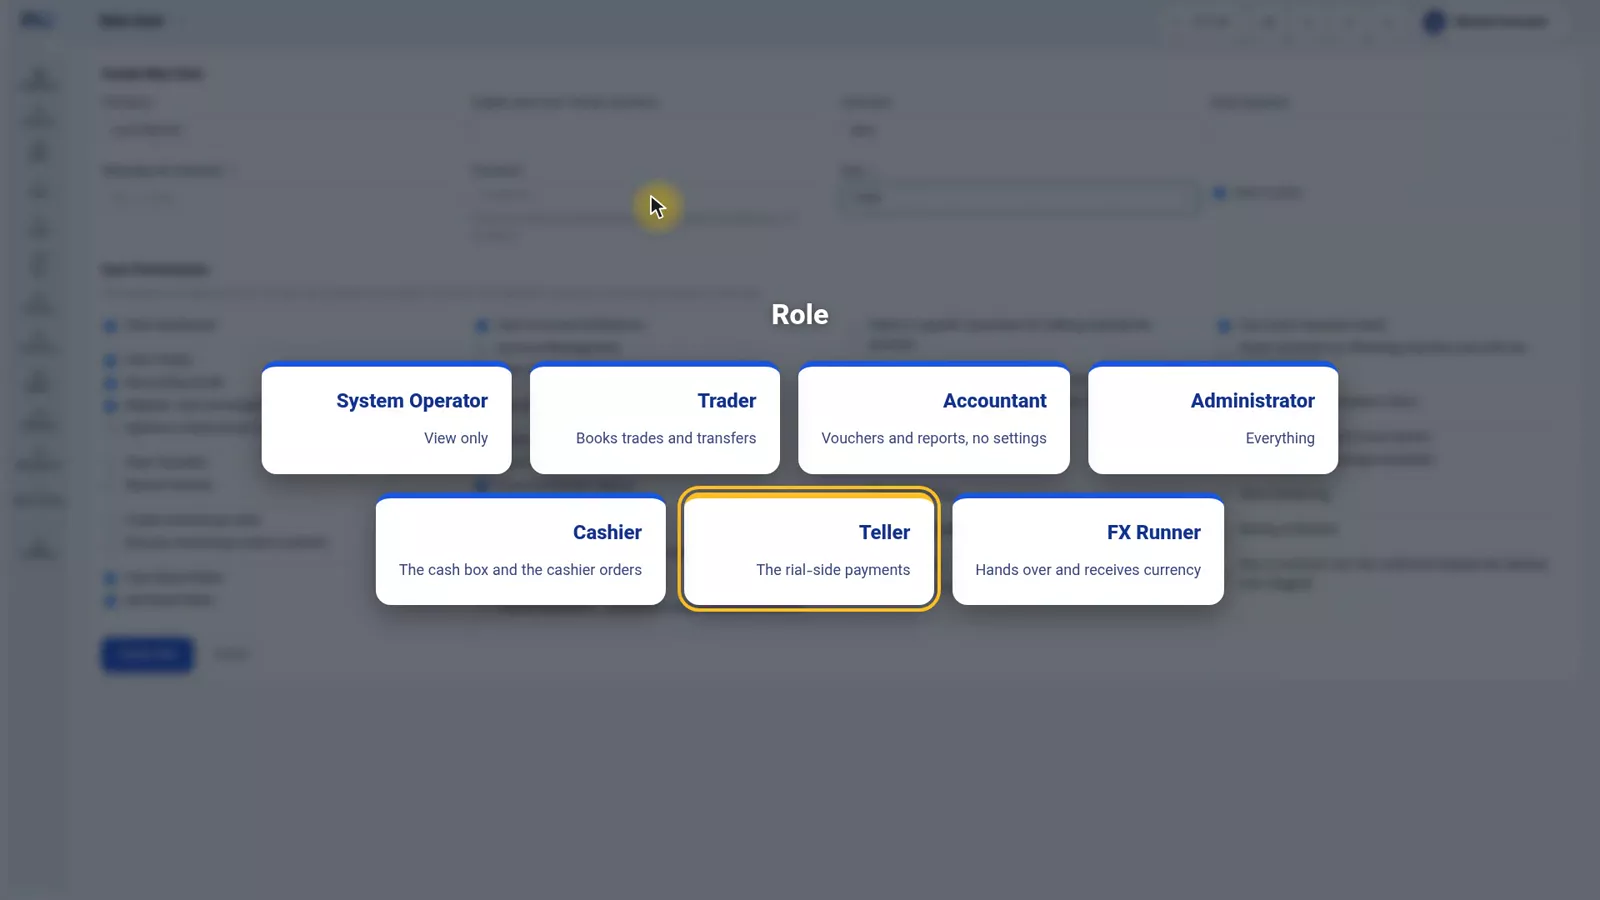
A user takes four fields: full name, username, password, and role. The role is the important one. Nexto ships with seven ready-made roles, and for most exchange offices those seven are enough — permissions in detail are the subject of users, permissions and two-step sign-in.
Save, and the user appears in the list. Hand the password to the person it belongs to and ask them to change it at their first sign-in.
Tips and warnings
- The reference currency and the rial/toman choice lock once the first voucher exists. Decide them with whoever owns the business, not at the counter.
- Check the rate mode of every currency by hand, including the ones Nexto guessed. A wrong mode produces a plausible number, never an error.
- Do not set decimals lower than a currency needs. Rounding losses are small, constant and impossible to trace back.
- Start with a tight adjustment window and zero backdating. Loosening them later is a five-second change.
- Keep the required-description guards on. They cost seconds now and save an investigation later.
- One login per colleague. Shared logins make the "who booked this?" question unanswerable.
Where to go next
The previous episode, a tour of the interface, shows the menu, Ctrl+K and the shape of Nexto's tables and forms. Next is the rate board and its guards, the fourth day-one job. After that come opening balances from the old ledger and customers and accounts. The seven roles are explained in users, permissions and two-step sign-in.
FAQ
What is the reference currency in Nexto?
It is the currency every summary and every profit and loss figure is expressed in. Any activated currency can be chosen, but a stable one is usual — the US Dollar, or the UAE Dirham for offices working mostly with the Emirates.
Can I change the reference currency later?
Only until the first voucher exists. The profit on each trade is calculated in the reference currency at the moment of booking and stored, so once documents exist the setting locks.
What is the difference between divide and multiply rate mode?
Divide mode is for currencies you quote per one Canadian Dollar, such as the Toman at 162,100 per dollar. Multiply mode is for currencies you quote per one unit of that currency, such as the Euro at 1.607 Canadian Dollars. Set it the wrong way round and 100 UAE Dirhams become 265 Canadian Dollars instead of 37.7, with no error shown.
What are the guards in the settings page?
Five checkboxes that each block a common mistake: a cash box going negative, the same amount sent to the same account twice within minutes, a trade or a transfer without a description, and a tracking code that has already been used.
Why does each colleague need a separate user?
Because every voucher records the name of the user who booked it. If the office works from a single login, that name is meaningless.
Full video transcript
This episode is about the jobs you only do once — and two of them have no way back at all. So half an hour spent on them today saves you hours of trouble later on. There are four jobs: the base settings, the currencies, the rate board, and the users. This is the settings page. It looks crowded, but only four parts of it matter on day one: the reference currency, the Iranian currency unit, the exchange details, and the guards. The rest we come back to whenever it is needed.
The first decision: the reference currency. The currency that every summary and every profit and loss figure is written in. Any currency you have activated can be the reference — here we have seven of them, so seven options. But usually a stable one is chosen: the dollar, or the dirham for people who work mostly with the Emirates. And why is there no way back? Because the profit on every trade is worked out in this currency at that very moment and stored.
Until the first voucher exists you can change it; after that it locks — and the lock is there to protect you, not to restrict you. The second decision belongs to Iran: rial or toman. The software knows both, but you have to pick one and stay with it to the end, because every figure is stored in that unit. The exchange details sit on every output: the statement, the PDF, the WhatsApp message. Write the name the way your customers know it, the phone and the address in full, and upload the logo right here.
Now three numbers that decide how freely a voucher can be corrected. The adjustment window: for how many days after entry a voucher can still be edited. The in-place edit window: within the first few hours, an edit that leaves no trace. And backdating: how many days into the past you are allowed to book. Our suggestion for a start: three days for the window, twenty-four hours for the in-place edit, zero for backdating. It is strict, but opening it up later is easier than reeling it back in.
And the guards. Five checkboxes, each of which stops one common mistake: the treasury guard will not let a cash box go negative; the repeat-transfer block refuses the same amount to the same account twice within a few minutes; a required description on a trade, and a required description on a transfer; and rejecting a tracking code that has already been used. Leave all of them on. The only one some people switch off is the required description — and then three months later they are looking at a voucher and nobody knows what it was for.
And we save. That is the base settings finished; now we move on to the currencies. Now the currencies. At the top of the page are the ones you have activated, and below it a world list of more than two hundred currencies, cryptocurrencies and gold, each of which is switched on with a single button. Every active currency has three things: a name, a number of decimals, and a rate mode. This column, the rate mode, holds one of two options for every currency: divide or multiply.
It is the single most important setting on this page, so let us look at the rule on paper first. The rate mode is the most important setting on this page, and it is where most of the mistakes happen. The rule itself is simple: if you quote the rate per one Canadian dollar — like the toman: every Canadian dollar is 162,100 tomans — that is divide mode. If you quote it per one unit of the currency itself — like the euro: every euro is 1.607 Canadian dollars — that is multiply mode.
And what happens if you set it the wrong way round? Put the dirham on multiply: a hundred dirhams, instead of 37.7 Canadian dollars, turns into 265 Canadian dollars. Seven times over. The software raises no error, because as far as it is concerned the number is fine — you are simply the one losing money. Decimals: the toman zero; the main currencies and Tether two; small cryptocurrencies such as Bitcoin, six to eight. If you set the decimals too low, figures get rounded and balances slowly drift apart by a few cents that nobody ever finds again.
And adding a new currency: write its name in the list below and press the plus button. We add the pound. It comes straight to the top, with a default mode the software has guessed for itself — but always check that mode yourself. And beside every currency there is a Remittance button: a separate currency for the same money but in remittance form, with a rate of its own. I click it on the dirham, and the dirham remittance is added to the list. For an exchange office that sells cash dirhams and remittance dirhams at two different prices, that means two balances and two rates, with nothing getting mixed up.
And if you did not need it, the same delete button takes it back off the favorites. The last job of day one: the users. Build a separate user for every colleague — before the real work starts, not afterwards. Because every voucher keeps the name of whoever booked it, and if everybody works from one login that name means nothing. We build a user: the full name, the username, the password, and the role. The role is the most important choice: you get seven ready-made roles, and for most exchange offices those seven are enough.
We go through the permissions in detail in the users and permissions episode. Save — and the user is in the list. Hand the password to them and ask them to change it at their first login. Finish these on day one: the reference currency and the currency unit — two decisions with no way back; the guards switched on; the currencies with the right mode; and one user for every colleague. Next episode is the rate board — the very number every profit is measured against.
Try it yourself right now
A complete private demo with sample data — no installation, no credit card.
Create free demo